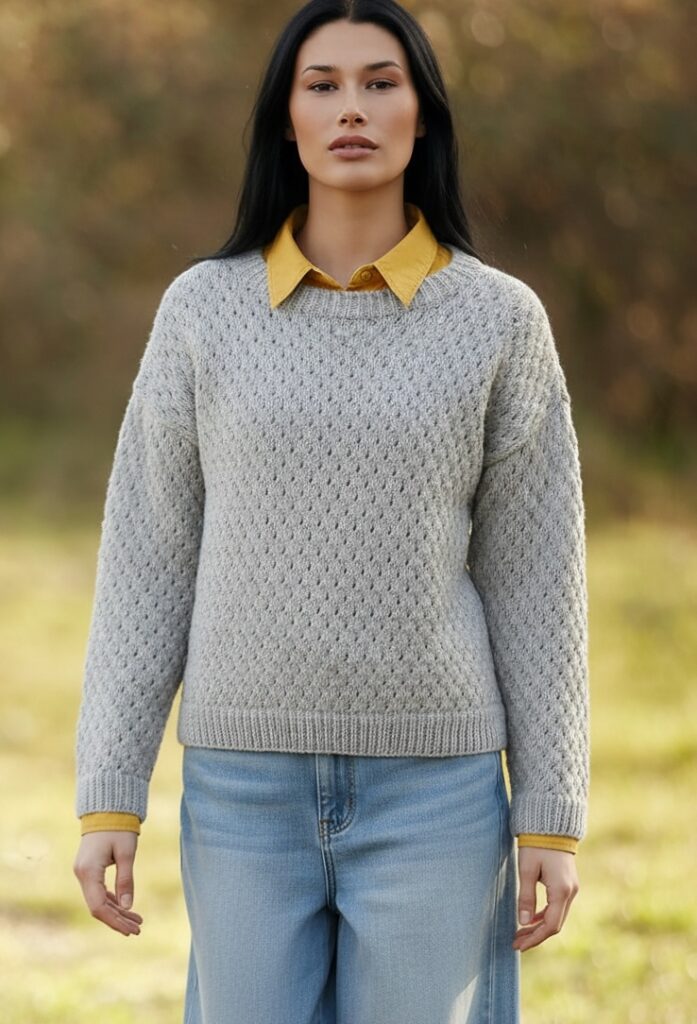
Looking for a free lace knit pullover pattern that combines understated elegance with everyday wearability? This design features a subtle, unobtrusive lace motif, making it the perfect addition to any casual wardrobe. The pattern is worked in Katia Prime Merino, a 100% superwash merino wool that offers 120 meters per 50 grams, ensuring both softness and durability. With instructions for sizes 38/40 (42/44) 46/48 (50/52) and using US size 7 (4.5 mm) needles, this project is approachable for advanced beginners and satisfying for experienced knitters. Below you will find every detail, from the ribbing to the lace chart and assembly, to create a beautiful hand-knit pullover. Let’s dive into this comprehensive, free lace knit pullover pattern.
Free Lace Knit Pullover Pattern: Everyday Elegance in Superwash Merino
Materials and Gauge for This Lace Pullover
To begin your free lace knit pullover pattern, you will need Katia Prime Merino (100% superwash merino wool, 120 m/50 g) in Light Brown (color No. 27). Total yardage requires 9 (10) 11 (12) skeins. You will also need US size 7 (4.5 mm) knitting needles.
Gauge: 20 sts x 26 rows = 10 x 10 cm (4 x 4 inches) in lace pattern on US size 7 needles. The lace stitch is worked from a chart, alternating between yarn overs and decreases.
Back Panel Instructions for a Free Lace Knit Pullover Pattern
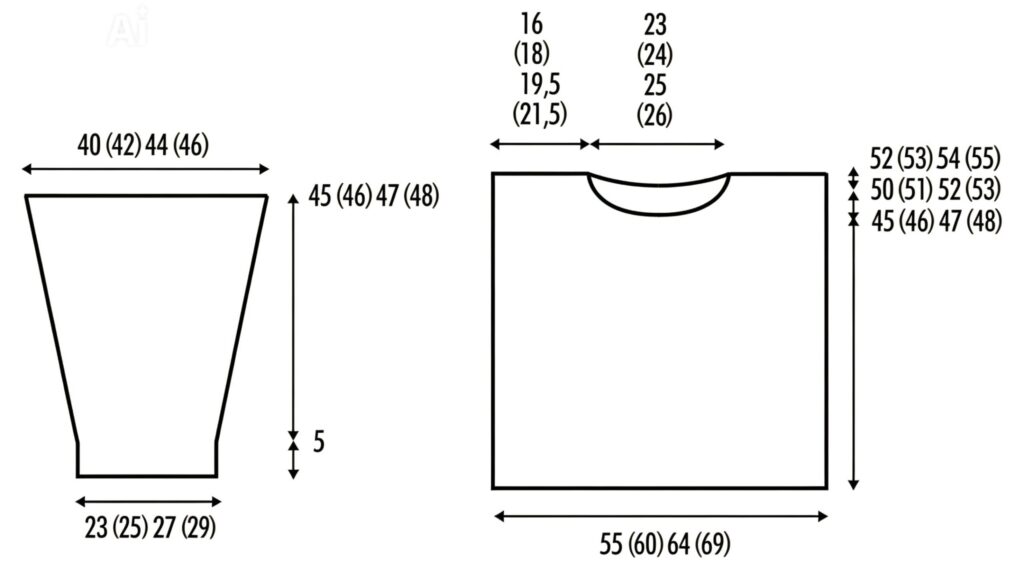
Cast on 111 (123) 127 (139) sts. Work 5 cm (approx. 2 inches) in ribbing: k1, p1 across. Then continue in the lace pattern according to the chart. At 50 (51) 52 (53) cm from the cast-on edge, bind off the center 27 (29) 31 (33) sts for the back neck. Finish each shoulder separately. For neck shaping, bind off 10 sts once at the inner edge. After 2 cm from the beginning of the neck, bind off the remaining shoulder sts: 32 (37) 38 (43) sts. Complete the second side symmetrically.
Front Panel and Neckline Shaping
Work the front exactly as the back until the armhole and neck region. At 45 (46) 47 (48) cm from the cast-on edge, bind off the center 23 (25) 27 (29) sts for the front neck. Now work each side separately. For the curved neckline, on the right side (public side) bind off at each neck edge every other row: 1 x 5 sts, 1 x 4 sts, 1 x 2 sts, 1 x 1 st. After 7 cm from the start of the neck shaping, bind off the remaining shoulder sts: 32 (37) 38 (43) sts. Work the other side to match.
Sleeves for This Knit Pullover Pattern
Using your free lace knit pullover pattern guide for sleeves: cast on 47 (51) 55 (59) sts. Work 5 cm ribbing, then switch to the lace pattern. For sleeve taper (increases), add 1 stitch on both sides every 6th row, 16 times. You will have 79 (83) 87 (91) sts after all increases. At 45 (46) 47 (48) cm from the cast-on edge, bind off all stitches loosely. Knit the second sleeve identically.
Assembly: Mattress Seams and Finishing
All seams are closed using the mattress stitch for a flat, invisible finish. Sew one shoulder seam. For the neckband: pick up 48 (50) 52 (54) sts along the back neck edge and 60 (62) 64 (66) sts along the front neck edge. Total stitches on needle: 108 (112) 116 (120). Work in ribbing (k1, p1) for 3.5 cm. Bind off using a tapestry needle (Italian or tubular bind-off recommended for elasticity). Then sew the second shoulder seam and the neckband seam. Set in the sleeves into the open armholes (length approx. 20 (21) 22 (23) cm), matching the center of the sleeve cap to the shoulder seam. Finally, sew the side seams and sleeve underarm seams. Lightly steam the seams.
Final Thoughts on Your Casual Knit Pullover
This free lace knit pullover pattern results in a sophisticated yet relaxed garment perfect for layering. The subtle lace adds texture without being overwhelming, and the superwash merino makes care simple. Enjoy wearing your handmade creation, and remember you can always find this free lace knit pullover pattern online for your next project.
Knitting Chart
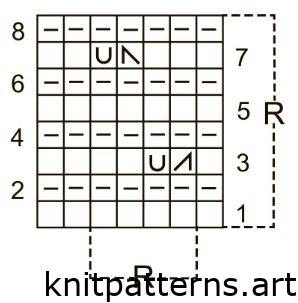
Symbol Key
⬜ knit stitch (k)
━ purl stitch (p)
/| knit 2 together (k2tog)
|\ slip 1, knit 1, pass slipped stitch over (sl 1, k1, psso)